
Table of Contents
- Recommended Installation Heights
2. Cooking Surfaces & What to Consider
3. Types of Range Hoods & Their Installation Process
4. Front Alignment vs. Extension
5. Conclusion

A range hood — also known as a vent hood or kitchen exhaust — serves as a vital piece of any cooking space. It draws smoke, grease, and heat upward and away from your stove, keeping your kitchen air fresh and your surfaces clean. But even the best range hood won't perform at its peak if it's mounted at the wrong height.
In this guide, we'll walk you through the ideal installation heights for different range hood types, the factors that influence your decision, and step-by-step installation tips so you can get your range hood positioned perfectly for maximum airflow and safety.

Featured Product
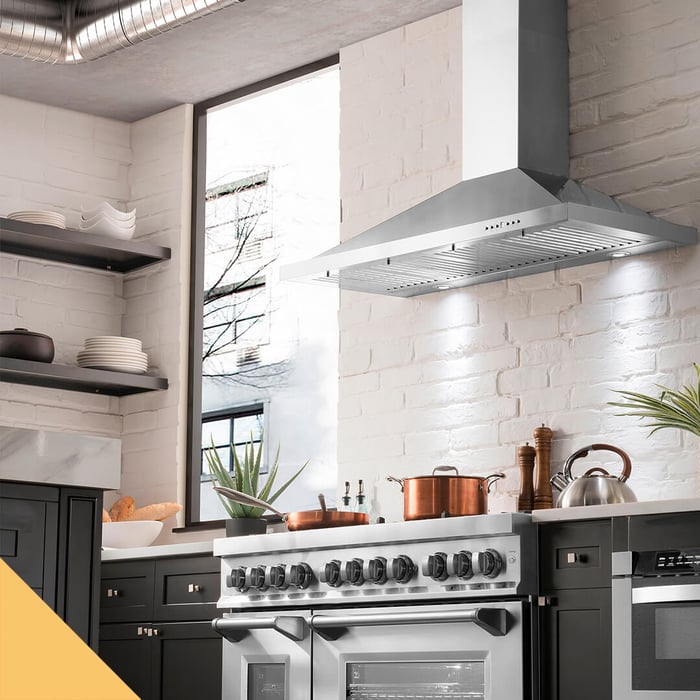
ZLINE Convertible Vent Wall Mount Range Hood in Black Stainless Steel (BSKBN)
This sleek wall-mount range hood delivers powerful ventilation in a striking black stainless finish. Featuring high-performance suction with four fan speeds, stainless steel baffle filters, and integrated LED lighting, it blends seamlessly into modern kitchens while keeping air crisp and clean.
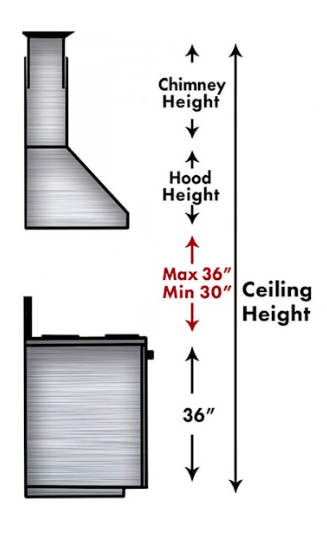
Recommended Installation Heights
Finding the right mounting distance between the bottom of your range hood and the cooktop below is essential for proper ventilation efficiency. Setting it too close can create a fire hazard, while placing it too far away weakens smoke capture. Here's what the standard guidelines look like:
Indoor Range Hoods
For interior kitchens, the standard recommendation is to mount your range hood 20 to 24 inches above an electric cooktop and 24 to 30 inches above a gas range. This range keeps the hood close enough to efficiently capture smoke, steam, and cooking odors while maintaining a safe clearance from open flames and heated elements. Gas stoves need additional distance because of the open flame and increased heat output at the burner level.
Outdoor Range Hoods
Outdoor cooking setups like grills and smokers call for a slightly higher clearance — typically 36 inches or more above the cooking surface. Outdoor hoods are built to handle larger plumes of smoke and higher heat levels. The additional distance accounts for the larger grilling surface, greater heat dispersal, and wind factors that affect outdoor ventilation. Always double-check the manufacturer's recommendation for your specific model.
⚠️ Other Factors to Consider
Keep in mind that personal cooking height, range hood blower capacity, ceiling height, and local building codes can all influence the ideal mounting position. After calculating the height based on the hood-to-cooktop distance, also factor in the ductwork requirements — your chimney height equals the distance from the ceiling to the top of the hood, and needs to fit within the chimney cover provided.
Cooking Surfaces & What to Consider
Different stovetops and cooking appliances generate varying levels of heat, which directly impacts where you should place your range hood. Understanding these differences will help you choose a height that balances effective ventilation with safe operation.
Safety Concerns
Excessive heat exposure can warp internal components, degrade the finish of your hood, and reduce the lifespan of the blower motor. In extreme cases, cooking grease trapped within a too-close hood can become a fire risk. Always keep a minimum safe distance based on your cooktop type — gas ranges especially need wider clearance to account for exposed flame.
Grease & Residue Buildup
If your range hood sits too close to the cooktop, grease and oil splatters can coat the filters and exterior surfaces much faster, making upkeep more demanding and potentially clogging the ventilation system. On the other hand, placing it too high allows grease particles to escape capture entirely, landing on surrounding cabinetry and walls instead.
Pro Tip: ZLINE and other leading manufacturers typically provide suggested mounting heights specific to each model. Following their published guidelines will help you avoid warranty issues while optimizing performance and kitchen aesthetics.

Types of Range Hoods & Their Installation Process
The method you use to install your range hood depends largely on its type and where it's being mounted. Here's a look at the most common setups and how each installation process differs.
Wall Mounted Range Hoods
Wall-mounted hoods attach directly to the wall above your range and vent either through the ceiling or out through an exterior wall. They're one of the most popular options for standard kitchen layouts. Here's how they typically go in:
Step 1: Install the mounting bracket or rail along the wall following the manufacturer's template.
Step 2: Connect the ductwork from the hood outlet to the dedicated vent opening.
Step 3: Align the range hood body against the wall bracket and secure it in position.
Step 4: Hang the hood on the bracket and make sure it sits level before tightening hardware.
Step 5: Run all electrical connections according to local code requirements.
Step 6: Perform airflow testing to confirm the ductwork is drawing properly.
Step 7: Install the chimney cover by sliding it over the duct and securing it to the wall bracket.
Step 8: Attach mesh or baffle filters, along with any trim pieces or decorative elements.
Step 9: Make a final check on mounting stability and confirm all connections before first use.
Under-Cabinet Range Hoods
Under-cabinet hoods mount directly to the bottom of a wall cabinet above the stove. They're a great space-saving option that keeps ventilation tucked neatly into the existing cabinetry layout. Installation typically involves:
Step 1: Position the mounting template on the underside of the cabinet and mark all screw locations.
Step 2: If venting through the cabinet, cut the duct opening using the template provided.
Step 3: Route the ductwork through the cabinet to the exterior wall or ceiling vent.
Step 4: Secure the range hood to the cabinet bottom using the provided hardware.
Step 5: Attach the ducting to the hood's exhaust port and seal all joints with foil tape.
Step 6: Complete the electrical hookup and test the fan speeds and lighting.
Island Range Hoods
Island hoods hang from the ceiling directly above a kitchen island cooktop. Since there's no wall to assist with mounting, these installations require strong ceiling support and careful alignment. Key steps include:
Step 1: Locate ceiling joists and install a sturdy support bracket that can bear the weight of the unit.
Step 2: Route the ductwork through the ceiling to the roof or nearest exterior exhaust point.
Step 3: Mount the hood's support frame or hanging rods to the ceiling bracket.
Step 4: Attach the hood body to the frame, ensuring it hangs level and centered over the cooktop.
Step 5: Connect ductwork and electrical wiring.
Step 6: Install the decorative chimney cover to conceal all ducting and wiring, then install filters.

Front Alignment vs. Extension
When deciding how to position the front of your range hood relative to the stove, two approaches are common — front alignment and extension — and each affects both aesthetics and airflow performance.
Front Alignment
With front alignment, the leading edge of the range hood lines up flush with the front of the stove or counter. This creates a clean, streamlined look and works well in kitchens where design continuity is a priority. It provides solid ventilation coverage for standard cooking and keeps the hood from protruding into the workspace.
Extension
Extension positioning pushes the hood slightly forward past the stove's front edge. This approach is ideal for high-output burners or deep cookware, where additional capture area ensures smoke and steam rising from the front burners don't escape into the kitchen. It maximizes ventilation reach at the cost of a slightly more prominent profile.
The best choice depends on the layout of your kitchen, the depth of your range hood model, and the style of cooking you do most often. High-heat wok cooking or deep frying, for instance, benefits significantly from the extended configuration.
Conclusion
We hope this guide helps you find the ideal range hood setup for your kitchen. Whether you're going with a wall-mount, under-cabinet, or island installation, getting the height right is a small detail that makes a huge difference in both safety and everyday comfort.
Ready to upgrade your kitchen ventilation? Explore our range of high-performance range hoods designed to blend seamlessly into any cooking environment — from cozy indoor kitchens to full-scale outdoor grilling stations.
Always consult your manufacturer's installation manual and, when in doubt, hire a qualified professional to handle the setup. Getting it right the first time means years of trouble-free, efficient performance.
Have Questions?
If you need more guidance or have specific installation questions, feel free to reach out to our team — we're happy to help you find the perfect fit for your space.