
Versatile Installation Solutions
Whether you go the DIY route or bring in a professional, having the right knowledge makes all the difference. Here is a breakdown of the setup methods, tools, and requirements you will need for a smooth range hood installation.

Supported Installation Methods
Most quality range hoods can be installed using one of three primary configurations, depending on your kitchen layout and personal preference:
Wall-Mounted — Attached directly to a vertical wall above your cooktop. This is the most common style and works beautifully in open kitchen designs.
Under-Cabinet — Mounted beneath an overhead cabinet with ductwork running through the cabinet or ceiling, keeping your kitchen looking clean and streamlined.
Insert (Built-In) — Integrated into custom cabinetry or a hood enclosure for a seamless, flush-mounted appearance.
Recommended Height: For best performance, position the hood between 27 and 29 inches above your cooktop surface.
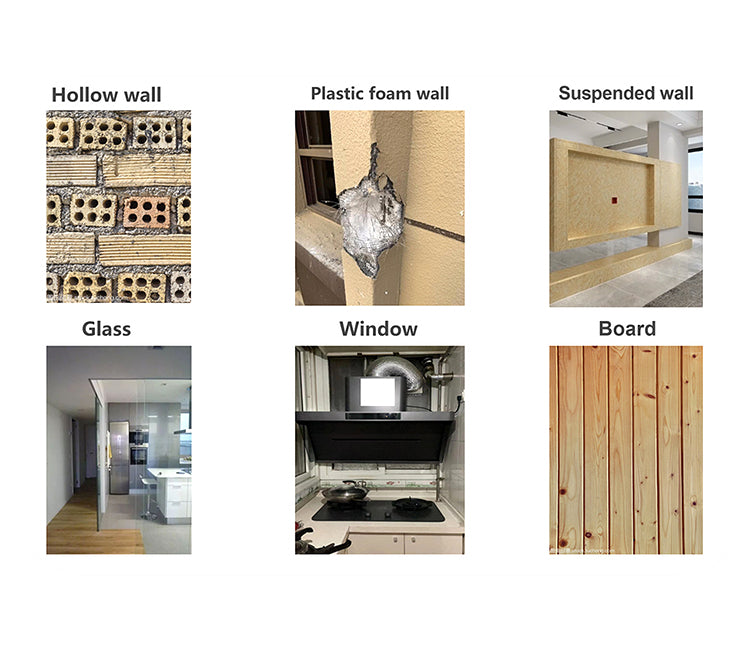
Ensure Proper Wall Support
Before you drill a single hole, verify that the surface you are mounting on can safely support the full weight of your range hood. The following wall types should be avoided:
✕ Hollow or perforated brick walls
✕ Foam-insulated or lightweight panels
✕ Unsupported partition walls
✕ Glass, window frames, or decorative surfaces
✕ Unsupported plywood or decorative paneling
Mounting on unsuitable surfaces may compromise stability and create safety hazards. If your wall type falls into any of these categories, consult a contractor or the manufacturer's support team before proceeding.
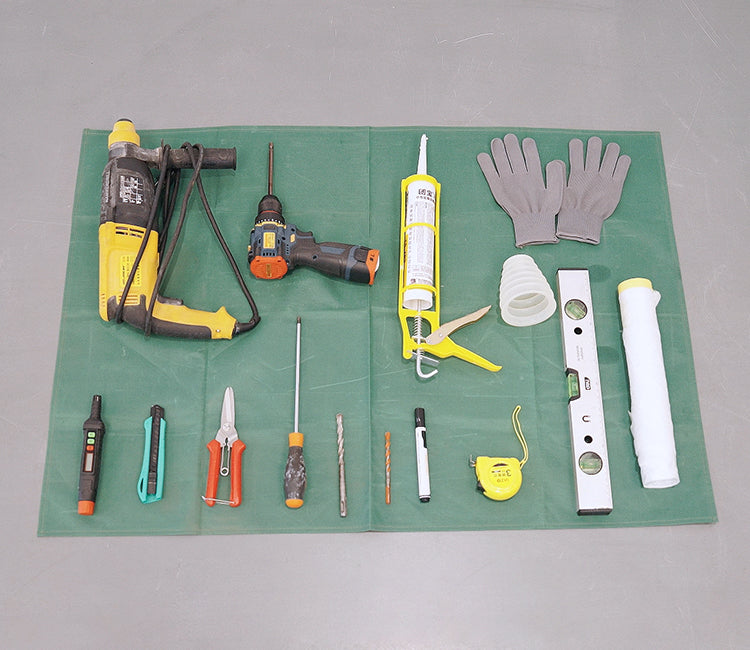
Required Tools for Installation
If you plan to handle the installation yourself, having the proper tools on hand will ensure the process goes smoothly and safely. Gather these essentials before you start:
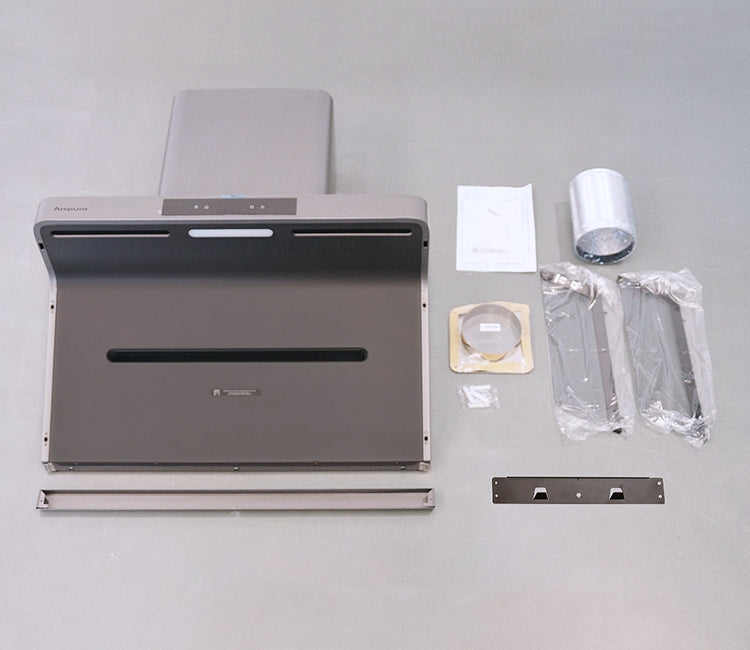
What You Can Expect in the Box
A quality range hood kit should include all the components you need for a complete installation. Here is a typical list of what most packages contain:
Main Components
1 × Range Hood Unit
1 × Mounting / Hanging Plate
1 × Outlet Duct (approx. 6" / 150 mm)
1 × Oil Collection Cup
1 × Air Vent Cover
2 × Smoke / Grease Screens
1 × Instruction Manual
Hardware & Accessories
Self-tapping screws (various sizes)
Expansion tubes & wood screws
Aluminium foil tape strips
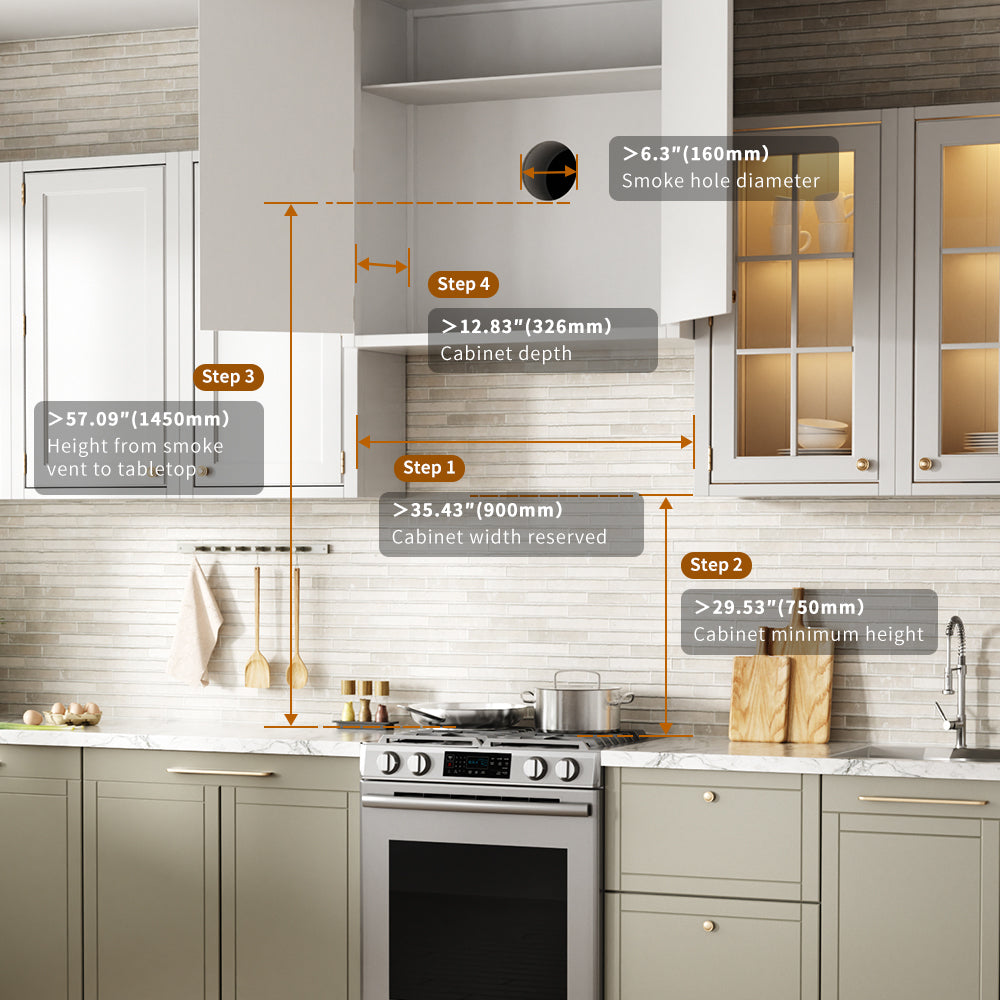
Ventilation Requirements
Before you begin, review these critical specifications to ensure a safe, code-compliant, and efficient installation.
Structural Support
Verify that the wall or cabinet you plan to mount on can safely bear the full weight of the hood. Avoid hollow, unsupported, or fragile surfaces entirely.
Electrical Specifications
You will need a grounded 120V outlet with a standard 3-prong plug. Never rely on extension cords or power strips for this type of appliance. Always disconnect power before starting electrical work.
Ducting Guidelines
Use a rigid, round metal duct measuring 6 inches in diameter. Keep it as short and straight as possible — ideally under 10 feet with no more than two bends. Flexible ducts are not recommended. Never vent into concealed areas like attics, crawl spaces, or ceilings.
Dimensional Specifications
Mount the hood 27 to 29 inches above the cooking surface. Maintain at least 6 inches of clearance between the hood top and the ceiling. Cabinet openings should measure no less than 17 inches wide by 13 inches deep.
Requirement Diagram
Complete Installation Overview
Designed for performance and reliability, a properly installed range hood transforms your kitchen ventilation and delivers lasting results.
Prepare the Installation Site
Clear the area above the cooktop. Take measurements, mark mounting points on the wall or cabinet, and confirm that all utilities are accessible and safely shut off.
Create Openings in Wall or Cabinet
Using the duct collar as a guide, carefully cut the ventilation hole to match the required diameter — typically around 6 inches for most models.
Install Brackets and Hood
Secure the mounting brackets to the wall or inside the cabinet using the provided hardware. Then carefully lift the hood into position and lock it onto the brackets.
Connect Ductwork and Power
Attach the metal duct securely with clamps or foil tape, ensuring an airtight seal. Plug the unit into a properly grounded outlet — avoid direct wiring unless specified.
Functional Testing
Power up the hood and test all speed settings. Run it at high speed for two to three minutes to verify proper airflow. Check lights, controls, and any additional features like delayed shutoff.
Ready to Upgrade Your Kitchen Ventilation?
Get the Awoco RH-IT06 — a super quiet, split insert stainless steel range hood with 800 CFM power, 4 speeds, mesh filters, and LED lights.
Awoco RH-IT06 Range HoodNot Sure If You Can Install It Yourself?
We are here to help. If your kitchen setup is complex or you simply prefer to leave it to the pros, reaching out to a qualified installer is always a smart move. Check with your range hood manufacturer or a licensed contractor in your area.
Frequently Asked Questions
Reliable answers to the most common range hood installation questions.
Can I Install a Range Hood by Myself?
Yes, many range hoods are designed for DIY installation, and most come with detailed manuals and video guides. That said, if the project involves complex ductwork or electrical wiring, it is a good idea to bring in a professional for safety and code compliance.
Does the Hood Come with Mounting Hardware?
Most quality range hoods include all the mounting hardware needed for standard installations — screws, expansion tubes, brackets, and sealing tape. Always check the included accessories list before beginning.
What Is the Ideal Mounting Height?
The recommended installation height is between 27 and 29 inches from the cooktop surface to the bottom of the hood. This range provides optimal smoke capture without interfering with your cooking.
What Type of Duct Should I Use?
Rigid, round metal ducting with a 6-inch diameter is recommended for most installations. Keep the run as short and straight as possible, with no more than two bends. Flexible ducting should be avoided as it restricts airflow and reduces efficiency.
What Are the Electrical Requirements?
Most residential range hoods require a grounded 120-volt outlet on a dedicated circuit. Extension cords and power strips are not recommended. Always disconnect the power supply before doing any electrical work during installation.
Can I Mount the Hood on a Tile Wall?
Absolutely. You will just need the appropriate drill bits for tile or masonry, along with proper wall anchors. Make sure the wall structure behind the tile is solid enough to support the unit.
What Are the Minimum Cabinet Requirements?
For under-cabinet or insert installations, the cabinet width should be at least 35 inches with a minimum internal clearance of roughly 17 inches wide by 13 inches deep. Check your specific model's specifications for exact dimensions.
Can I Install a Range Hood Without an Overhead Cabinet?
Yes. Wall-mount configurations do not require a cabinet at all. Just ensure that the total clearance from cooktop to the duct outlet falls within the manufacturer's recommended range, typically between 57 and 60 inches.
Can I Use My Own Ductwork?
In most cases, yes — as long as the existing ducting meets the required size and material specifications. Confirm compatibility with the manufacturer's guidelines before connecting.
Do I Need a Professional Assessment Before Purchasing?
While not mandatory, reviewing the installation requirements or scheduling a professional on-site evaluation is highly recommended. This helps confirm that your kitchen layout, electrical setup, and ductwork are compatible — saving you time, money, and potential return hassles down the road.
Browse our selection of range hoods and kitchen ventilation solutions built for performance, easy installation, and lasting quality.
Awoco RH-IT06 Range Hood