
Why Ductless Mini-Split Installation is Gaining Popularity
Ductless mini-split systems have transformed the way homeowners approach heating and cooling. These versatile units offer an efficient alternative to traditional HVAC systems, delivering precise temperature control without the need for extensive ductwork throughout your home.
The appeal is straightforward: lower energy bills, quieter operation, and the flexibility to heat or cool individual rooms exactly as needed. Whether you're upgrading an older home, finishing a basement, or adding comfort to a garage workshop, mini-splits provide a practical solution that traditional systems simply cannot match.
In this comprehensive guide, we'll walk you through everything from understanding system costs to completing a successful installation, helping you make informed decisions for your home comfort needs.
System Components Overview

Understanding Mini-Split Systems and Costs
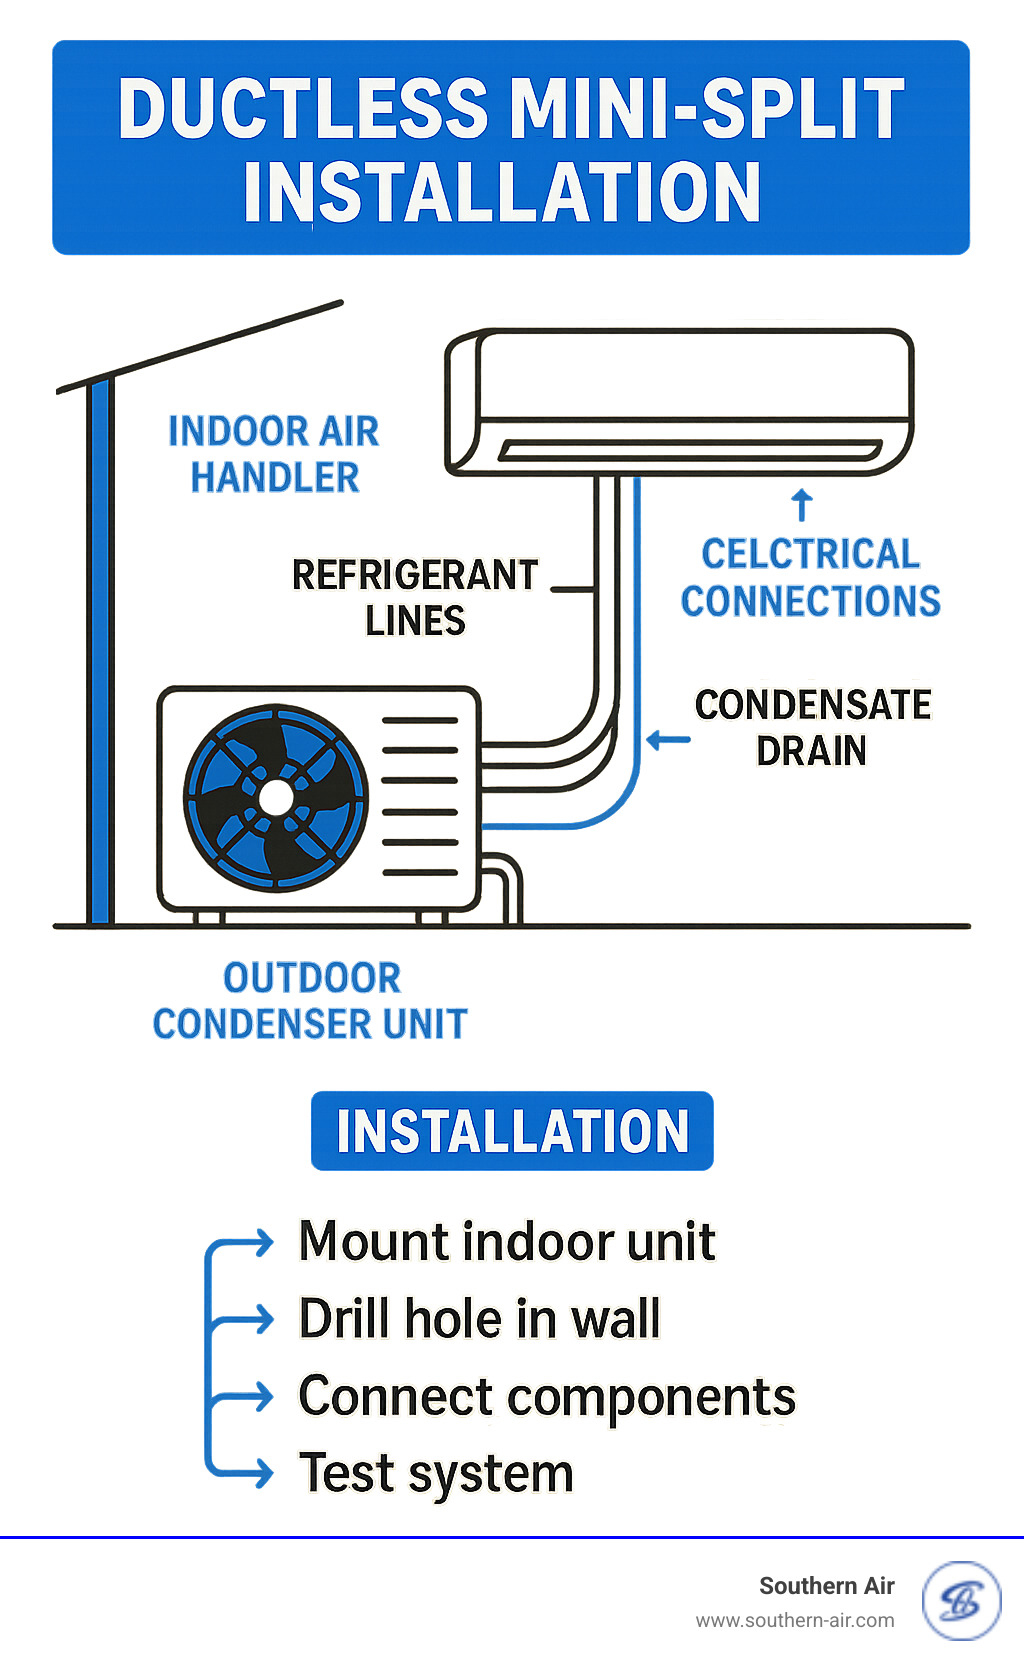
A ductless mini-split system consists of two primary components: an outdoor compressor unit and one or more indoor air-handling units. These components connect through a small conduit that houses the power cable, refrigerant tubing, suction tubing, and condensate drain line.
The beauty of this design lies in its simplicity. Unlike central air systems that require extensive ductwork, mini-splits only need a three-inch hole through your wall to connect the indoor and outdoor units. This minimal intrusion makes them ideal for retrofitting older homes or adding climate control to spaces where duct installation would be impractical or prohibitively expensive. Modern mini-splits also function as heat pumps, providing both cooling in summer and efficient heating during cooler months. This dual functionality eliminates the need for separate heating and cooling systems, streamlining your home's climate control while reducing equipment costs and maintenance requirements.
Sizing and Efficiency
Proper sizing is crucial for optimal performance and energy efficiency. An undersized unit will struggle to maintain comfortable temperatures, running constantly and driving up energy costs. Conversely, an oversized system cycles on and off too frequently, reducing efficiency and shortening the equipment's lifespan.
Quick Sizing Reference
As a general guideline, plan for approximately 20 BTU per square foot of living space. A 500 square foot room typically requires a 12,000 BTU unit, while larger spaces of 1,000 square feet or more may need 24,000 BTU or higher capacity systems.
Factors affecting your sizing calculation include ceiling height, insulation quality, window size and orientation, local climate conditions, and the room's intended use. Rooms with high ceilings, large windows, or poor insulation require additional capacity to maintain comfort.
Types of Ductless Systems
Ductless systems come in configurations to match virtually any application. Understanding your options helps you select the right system for your specific needs.
Single-Zone Systems
Perfect for individual rooms, additions, or supplementing existing HVAC. One outdoor unit connects to one indoor unit for targeted climate control.
Multi-Zone Systems
A single outdoor compressor supports multiple indoor units, allowing independent temperature control in different rooms throughout your home.
Ceiling Cassettes
Installed flush with the ceiling for a discreet appearance. Ideal for commercial spaces or homeowners who prefer hidden HVAC equipment.
Typical Costs and Potential Savings
Investment in a ductless mini-split system varies based on capacity, brand, features, and installation complexity. Understanding the cost landscape helps you budget appropriately and recognize value when comparing options.
Long-term savings often offset initial investment. Ductless systems operate at significantly higher efficiency ratings than traditional HVAC, with many models achieving SEER ratings of 20 or higher. Homeowners frequently report energy savings of 25-40% compared to conventional systems, particularly when replacing older equipment or eliminating leaky ductwork.
Ready to Upgrade Your Home Comfort?
The Senville 36000 BTU Dual Zone system delivers powerful heating and cooling for multiple rooms with whisper-quiet operation and energy-efficient inverter technology.
Senville 36000 BTU Dual ZoneThe Great Debate: DIY vs. Professional Installation
The question of whether to tackle mini-split installation yourself or hire a professional deserves careful consideration. Both approaches have merit, and the right choice depends on your skills, comfort level, and specific circumstances.
✓ DIY Installation
DIY installation can save $500 to $2,000 or more in labor costs. Pre-charged line sets eliminate the need for specialized vacuum pumps and refrigerant handling in some cases.
Requires comfort with electrical work, drilling through walls, and following detailed technical instructions. May void manufacturer warranty if not performed correctly.
★ Professional Installation
Professionals bring experience, proper tools, and certification for refrigerant handling. Installation typically includes warranty protection and ensures code compliance.
Higher upfront cost but provides peace of mind and typically faster completion. Essential for complex multi-zone installations or situations requiring electrical upgrades.
When to Hire a Professional
Certain situations strongly favor professional installation. Recognizing these scenarios helps you make the smartest decision for your project.
Multi-zone systems with multiple indoor units increase complexity significantly. Coordinating refrigerant distribution, ensuring proper line sizing, and balancing airflow across zones requires expertise that comes from experience.
If your electrical panel needs upgrading or your home requires new dedicated circuits, a licensed electrician should handle this work regardless of who installs the mini-split itself. Electrical work carries safety risks and code requirements that demand professional attention.
Consider professional installation when the outdoor unit location presents challenges, such as rooftop mounting, locations requiring long line runs, or situations where the compressor must be positioned far from ideal placement. These scenarios require problem-solving skills and specialized equipment.
Benefits of Professional Installation
Warranty Protection
Many manufacturers require professional installation to validate warranty coverage.
Proper Sizing
Professionals perform load calculations to ensure your system is correctly sized.
Code Compliance
Licensed contractors understand local building codes and permit requirements.
Refrigerant Handling
EPA certification is required for handling refrigerants, which professionals possess.
Professional installers also bring liability insurance, protecting you from responsibility if something goes wrong during installation. This coverage provides valuable peace of mind, especially for installations involving roof penetrations or electrical work.
Your Step-by-Step Ductless Mini-Split Installation Guide
For those proceeding with DIY installation, following a systematic approach ensures success. This guide covers the essential steps from preparation through system startup.
Preparation and Tools
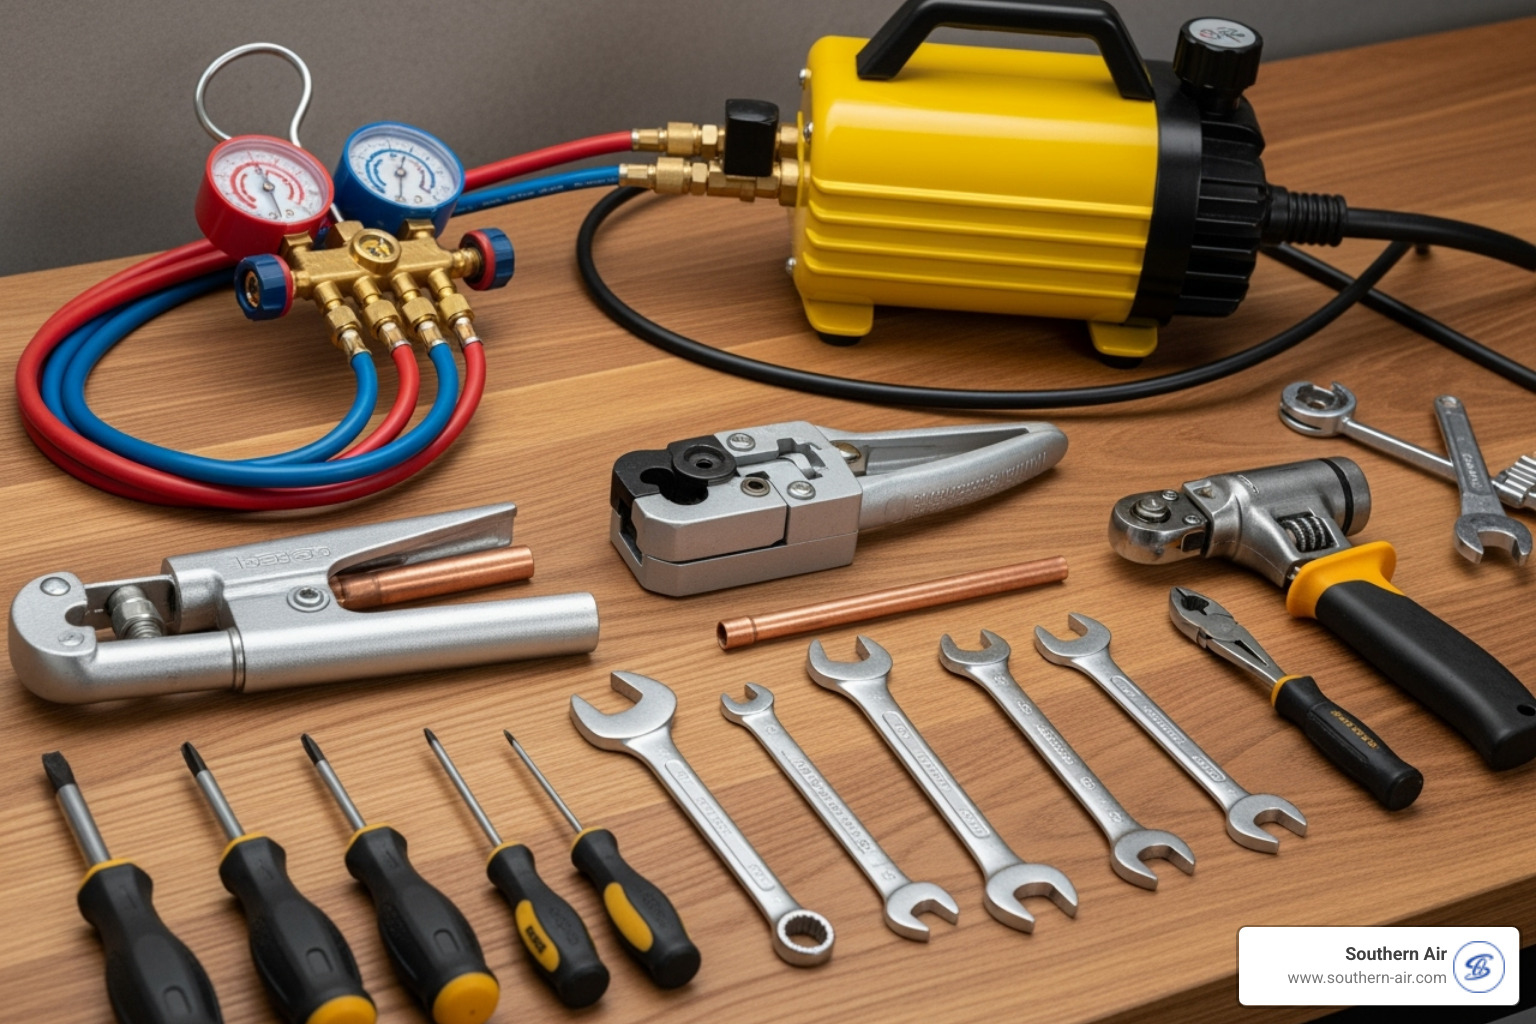
Begin by gathering all necessary tools and materials. You'll need a drill with hole saw attachment, level, stud finder, torque wrenches, vacuum pump (if not using pre-charged lines), manifold gauges, and basic hand tools.
Review the installation manual thoroughly before starting. Identify the indoor unit mounting location, ensuring adequate clearance around the unit for airflow and maintenance access. Locate wall studs and verify there are no electrical wires or plumbing behind your chosen mounting spot.
Installing the Indoor Unit
Mount the indoor unit's mounting plate securely to the wall, ensuring it's perfectly level. The plate must be anchored to wall studs or using appropriate anchors rated for the unit's weight.
Drill the hole for the line set, angling slightly downward toward the outside to promote condensate drainage. Feed the refrigerant lines, electrical connections, and drain line through the wall before hanging the indoor unit on its mounting plate.
Installing the Outdoor Unit
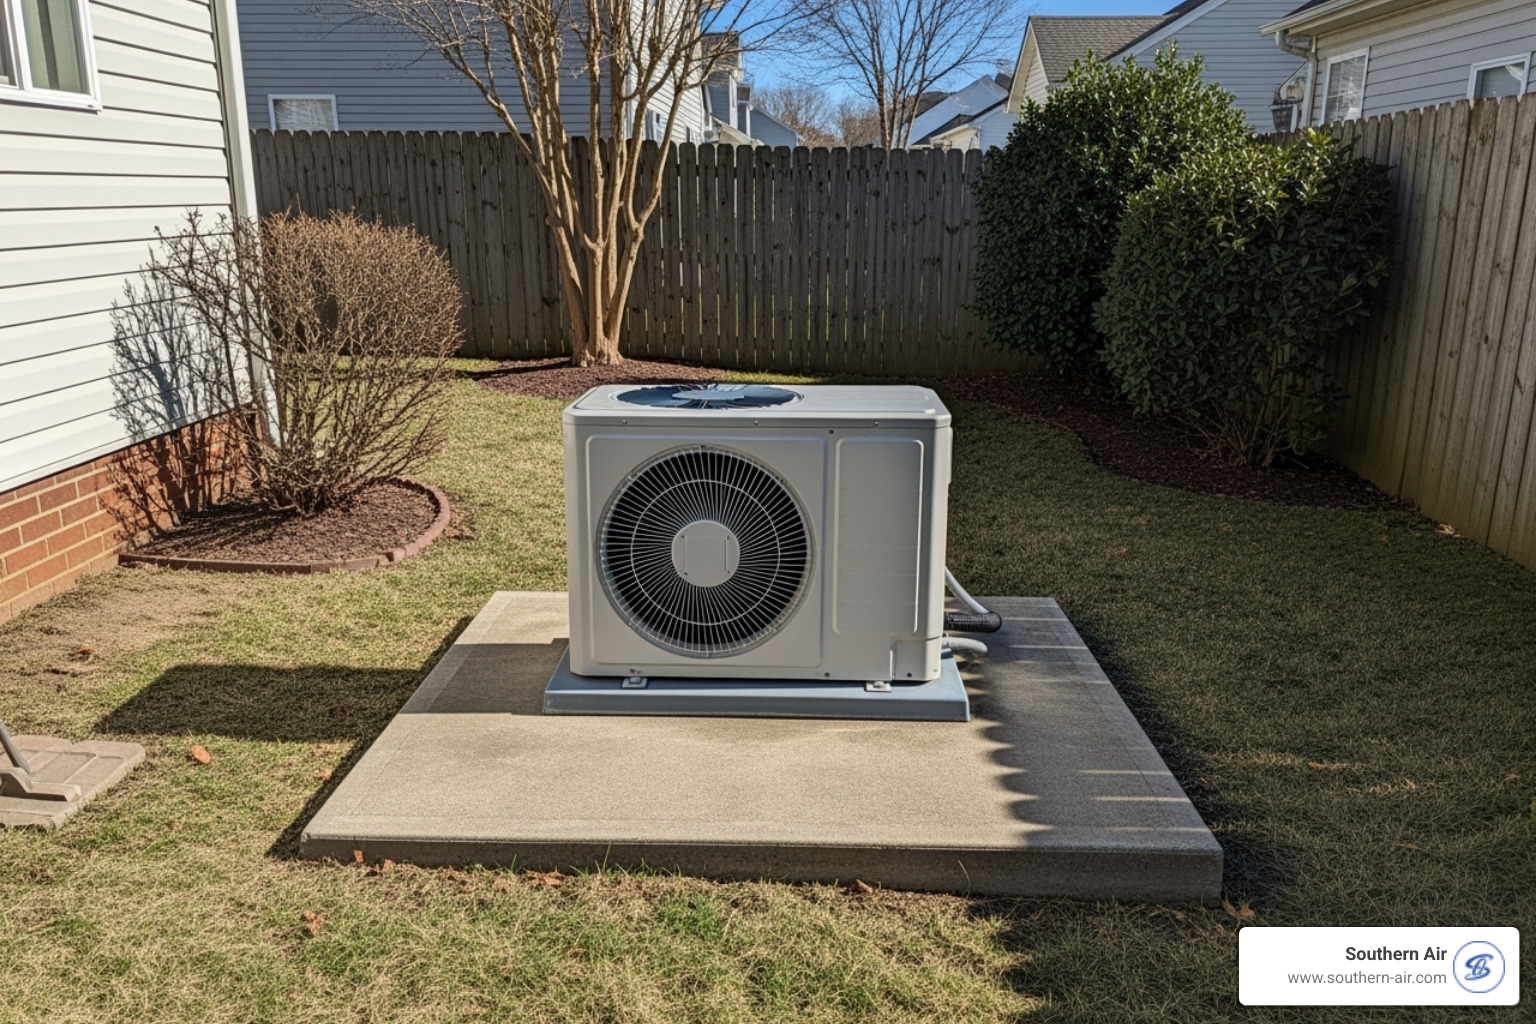
Position the outdoor condenser unit on a stable, level surface. A concrete pad or mounting brackets work well, keeping the unit elevated above potential snow accumulation and providing adequate clearance for airflow.
Maintain minimum clearance distances specified in your installation manual, typically 12-24 inches on sides with airflow and several feet in front of the unit where heated or cooled air exhausts. Avoid locations where the unit will be exposed to debris, dripping water, or direct exhaust from dryer vents.
Connecting the System
Connect the refrigerant lines using proper flaring techniques and torque specifications from the manual. Improper connections cause refrigerant leaks, the most common source of mini-split problems.
Complete electrical connections according to the wiring diagram, ensuring proper grounding. If not using pre-charged line sets, evacuate the system with a vacuum pump to remove air and moisture before releasing refrigerant from the outdoor unit.
Complete Your Project with Quality Equipment
Get reliable heating and cooling for your entire home with the Senville Dual Zone Mini-Split system, featuring easy installation and exceptional energy efficiency.
Senville 36000 BTU Dual ZonePost-Installation Care and Maintenance
Proper maintenance ensures your mini-split operates efficiently for years to come. Establishing a regular maintenance routine protects your investment and maintains optimal performance.
Essential Maintenance Tasks
Filter Cleaning: Clean or replace filters monthly during heavy use seasons. Clogged filters restrict airflow, reducing efficiency and potentially damaging the compressor.
Outdoor Unit Care: Keep the area around the outdoor unit clear of debris, vegetation, and obstructions. Gently clean the condenser coils annually with a garden hose.
Condensate Drain: Check the drain line periodically to ensure it's clear and draining properly. A blocked drain causes water damage and can trigger system shutdowns.
Professional Service: Schedule annual professional maintenance to check refrigerant levels, inspect electrical connections, and verify overall system operation.
Frequently Asked Questions about Ductless Mini-Split Installation
What are the main disadvantages of a ductless mini-split?
The primary considerations include higher upfront costs compared to window units, aesthetic impact of wall-mounted indoor units visible in living spaces, and the need for professional installation in many cases. Additionally, each indoor unit requires its own wall penetration, and some homeowners find the appearance of multiple indoor units throughout the home less appealing than hidden ductwork.
Can I install a mini-split on an interior wall?
Yes, interior wall installation is possible but requires routing the line set through ceiling space or along walls to reach an exterior location for the outdoor unit. This approach increases installation complexity and cost but offers more flexibility in unit placement. Condensate drainage also needs careful planning when the unit isn't on an exterior wall.
What are the electrical requirements for a mini-split?
Most residential mini-splits require a dedicated 20-amp or 30-amp circuit, depending on the system's capacity. Larger units or multi-zone systems may require 240-volt service. Your installation manual specifies exact electrical requirements, and local codes may mandate permits and inspections for new electrical circuits.
How long does mini-split installation typically take?
Professional installation of a single-zone system typically takes 4-8 hours. DIY installation may take longer, especially for first-time installers. Multi-zone systems require additional time for each indoor unit, with complex installations potentially spanning multiple days.
Conclusion
Ductless mini-split installation represents a smart investment in home comfort and energy efficiency. Whether you choose professional installation or take the DIY route, understanding the system components, proper sizing, and installation requirements sets you up for success.
The flexibility these systems offer makes them suitable for virtually any application, from single-room additions to whole-home climate control. With proper installation and regular maintenance, your mini-split system will provide reliable, efficient comfort for many years.
Take time to evaluate your specific needs, consider the complexity of your installation, and choose the approach that makes the most sense for your situation. Quality equipment combined with proper installation delivers the comfort and efficiency that make mini-splits such an attractive option for modern homes.
Start Your Mini-Split Project Today
Browse our selection of high-quality mini-split systems and find the perfect fit for your home.
Senville 36000 BTU Dual Zone