
Transform your backyard into a professional training facility with the Junior Hack Attack pitching machine. This comprehensive guide walks you through setup, safety protocols, and optimal usage techniques to maximize your practice sessions.
Initial Setup and Machine Positioning
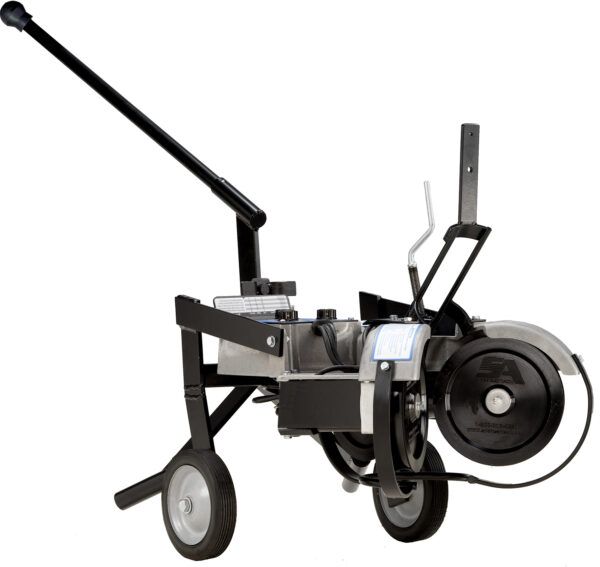
Unpacking Your Equipment
After removing your Junior Hack Attack pitching machine from its packaging, locate the horizon tal swivel lock positioned securely on the base. Turn the elevation adjustment to ensure the throwing head is level with the ground before beginning setup.
Proper Leg Positioning
Begin by inserting the rear leg first into its designated slot with the push-button mechanism engaged. Once the rear leg locks into position, ensure it remains secure throughout the setup process. Next, attach the two front legs, inserting them into their corresponding slots on the undercarriage using the same push-button locking system around the front of the Junior Hack Attack machine's base assembly.
Positioning for Optimal Performance
The recommended distance from home plate is approximately 45 feet for youth training sessions. However, you have complete flexibility to adjust this placement based on your specific training objectives and available space. Position the machine to face directly toward the strike zone, maintaining alignment through the front legs. Rotate the frame legs as needed to achieve perfect orientation toward your designated practice area.
Safety Protocols and Best Practices
Safety is Absolutely Essential
Operating the Junior Hack Attack requires strict adherence to safety guidelines at all times. Never compromise on these critical protocols:
- Always maintain awareness of all individuals within the practice area. Children and adults alike must understand proper safety distances and procedures.
- Never operate with exposed wiring, damaged components, or frayed electrical connections that could present shock hazards or cause equipment failure.
- Never insert hands, fingers, or any objects into the rotating wheels during operation. The wheels maintain high speeds and can cause severe injury.
- Both the pitcher/operator and batter must wear properly fitted protective gear including helmets at all times.
- The machine operator must maintain a protected position behind a screen, wall, or protective barrier throughout the practice session.
- Always ensure power is completely disconnected before performing any adjustments or maintenance procedures.
Elevation and Directional Adjustments
Utilize the elevation adjustment handle positioned at the rear or side of the machine to modify pitch trajectory. To achieve pitches directed inside or outside the strike zone, adjust the rear leg positioning. When precision directional changes are needed for targeted practice, you may need to reposition the complete machine assembly.
Pitch Selection and Wheel Configuration
The three-wheel configuration allows you to navigate the ball cleanly through the machine and deliver a comprehensive variety of pitch types. By fine-tuning the settings, you can replicate:
Fastballs
High-velocity straight pitches
Curveballs
Breaking pitches with vertical drop
Sliders
Lateral breaking pitches
Split Fingers
Late-dropping changeup variations
The instruction manual provides detailed guidance on adjusting wheel speeds after initial pitch spin and trajectory. Understanding these variables allows you to customize each training session with precision and variety. The machine's sophisticated controls enable you to seamlessly transition between pitch types, maintaining consistent timing and rhythm throughout practice sessions.
Ball Loading Technique for Batting Practice
Preparing for Effective Practice
When feeding balls into the machine, timing and technique are paramount. Verify that the batter has assumed their ready position and stance before initiating the feed. Position your throwing hand to release balls toward the chute entrance in an effortless, fluid motion.
Hold the ball comfortably against the chute opening using minimal pressure. As the wheels engage and begin their rotation, allow the ball to flow smoothly into the mechanism, maintaining consistency across all deliveries. Release timing is crucial—this feeding motion directly influences a hitter's ability to develop proper stride mechanics and reaction timing that translate to game situations.
Ground Ball and Defensive Fielding Practice
Position the throwing head at ground level to simulate infield practice scenarios including grounders, line drives, and lowering pop-ups. For comprehensive defensive training sessions, adjust both the elevation settings and horizontal directional lock as needed to create realistic fielding angles and trajectories.
Transportation and Storage Guidelines
Moving Your Equipment Safely
Following each practice session, proper transportation and storage procedures extend the life of your investment:
Speed Reduction
Decrease all three wheel speeds to 70% capacity, then disconnect power and begin the unplugging sequence.
Complete Shutdown
Allow sufficient time for the rotating wheels to reach a complete stop before initiating any movement procedures.
Leg Management
Carefully disengage and remove the throwing wheel guard assembly, followed by systematic removal of the front legs and rear leg from their transport wheel positions.
Vehicle Loading
For transportation via vehicle, utilize the machine's 15-pound frame weight to your advantage—it remains easily maneuverable with adequate clearance for single-person handling.
Ongoing Maintenance and Equipment Care
Preserving Peak Performance
Maintaining your Junior Hack Attack pitching machine in excellent working condition requires regular attention to key components:
- Routinely inspect the elevation control mechanism and swivel lock area for accumulated debris and wear indicators.
- Clean the throwing wheel surfaces and surrounding housing after each extended practice session to remove residue buildup.
- Avoid prolonged exposure to direct sunlight when storing your machine, as UV degradation can compromise plastic components and fade protective surfaces. Never leave wheels or mechanical parts exposed to extreme weather conditions.
- Conduct thorough examinations of all balls, bolts, and fasteners for damage or loosening. Recalibrate accuracy settings and perform necessary adjustments whenever wear becomes apparent.
Baseball and Softball Compatibility
To maximize the versatility of your machine, select balls recommended specifically by the manufacturer. In this configuration, the manufacturer suggests utilizing "real" leather baseballs engineered specifically for pitching machine applications.
Additionally, the Junior Hack Attack pitching machine seamlessly accommodates dimpled balls, lite balls, and various softball specifications including standard and reduced-impact training balls. While numerous ball types prove compatible with the machine's capabilities, certain varieties may experience accelerated wear or reduced accuracy due to construction differences or material composition inconsistencies.
Maximize Your Backyard Training Investment
Whether you're conducting intensive batting practice sessions, running defensive drills in your yard, or preparing for competitive play, the Junior Hack Attack pitching machine delivers professional-grade accuracy and exceptional durability. This comprehensive system provides everything youth athletes need to train effectively in the comfort and convenience of their own backyard.
With proper setup procedures, consistent safety protocols, and regular maintenance practices, this machine transforms any outdoor space into a legitimate training environment where skills develop and confidence grows with every practice session.