

This is one of the easiest builds you will ever tackle. The whole idea came about when a local shop was shut down and buying a commercial dolly was out of the question. So the next best thing? Build one from scratch using PVC pipe and a handful of hardware-store parts.
There is nothing revolutionary about this design — plenty of makers have done similar builds. But once it was finished and actually worked, it seemed worth documenting. If you have even basic hands-on skills, you can put this together in under an hour.
The video link below shows the dolly in action. The full clip is at the end of this walkthrough.
Parts You Will Need

Here is everything that went into this build. Gathering everything upfront saves time and keeps the project flowing smoothly:
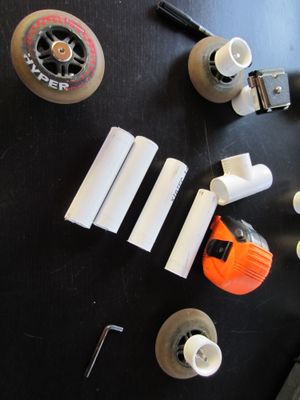
• 4 wheels — Grab an inexpensive set from a hardware or hobby store. Inline skate wheels work, but any small caster-style wheel will do the job.
• 8 PVC pipe end caps — Standard size matching your pipe diameter.
• 5 bolts, nuts, and washers — Pick sizes that fit snugly through your caps. More detail in Step 2.
• 1 PVC T-joint
• 2 PVC elbows
• 1 length of PVC pipe — A single piece from your local home center will be more than enough. Standard diameter will do.
Check the photos in this step and the next — between them you can see every single item required for the build.
Preparing the Spinning Hardware

 The bolt assembly is the heart of each wheel mount. A hex wrench-style bolt was used here, paired with a spacer, a locking washer, and a nut that grips firmly. The trick is figuring out the ideal bolt length — too short and it will not engage properly, too long and it wobbles.
Dial in the right length by test-fitting at the hardware store. Once the PVC caps are in hand, hold a bolt through one and check the clearance. The width should match the inner bore of the wheel snugly.
Drill a hole through the center of each end cap, then thread the bolt through with the wheel on the outside. The locking nut seats against the interior wall of the PVC so the wheel spins freely but stays secure — that free rotation is essential.
Adding a Camera Mount

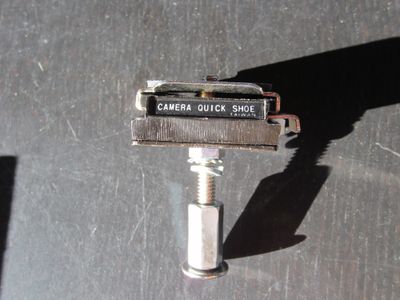

This is where the project gets a little more specialized. A quick-release camera mount — the kind you see on tripods — had been sitting in a parts bin for ages. They are still widely available at camera shops and online retailers.
An extra nut-and-bolt pair secures the mount plate to the spare end cap, keeping everything low-profile and stable. This step is optional if you plan to use the dolly for something other than camera work, but it adds versatility.
Cutting the Body Sections
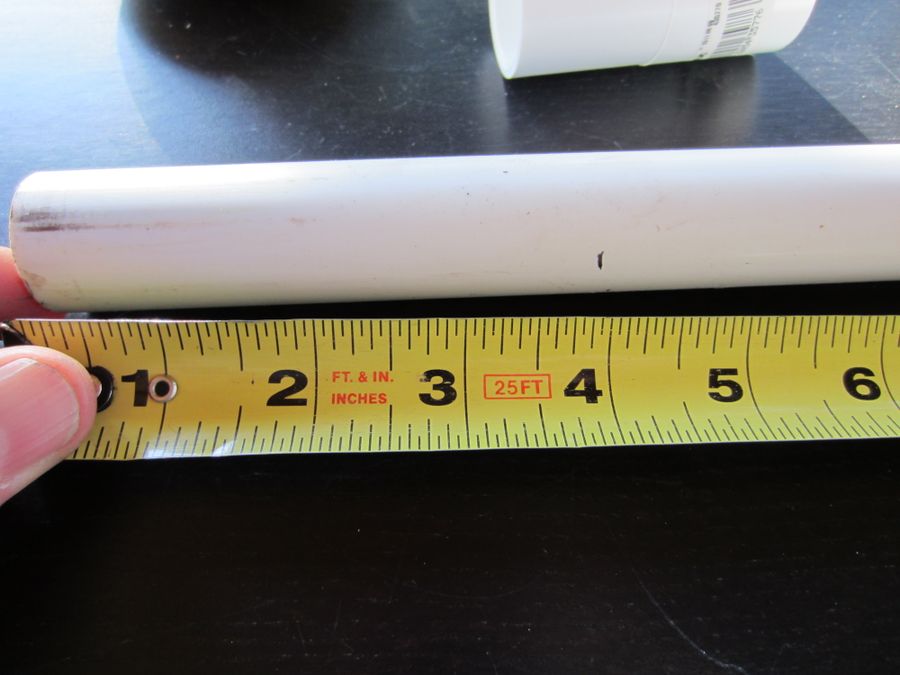


Take the PVC pipe and cut four sections at roughly four inches each. Two of these become the axle housings, and the other two form the crossbar and the main support neck. The body pieces can technically be any length — shorter gives a more compact dolly, longer adds stability — but four inches is a solid starting point.
That means seven or eight short PVC segments in total. A basic hand saw makes quick work of these cuts.
Final Assembly
Once every piece is prepped, the centerpiece comes together almost instantly. Slide the pipe segments into the T-joint and elbows, press the wheel-mounted end caps onto each axle end, and you are done. No adhesive is required for light-duty use.
The beauty of this setup is its adjustability. The neck height can be changed by swapping in a longer or shorter pipe segment, and the whole frame disassembles in seconds for storage. It rolls smoothly on any flat, hard surface — tables, countertops, even a concrete floor.
For heavier loads or rougher surfaces, consider applying PVC cement to the joints for permanent rigidity. A fully glued version holds up surprisingly well under real working conditions. Either way, this simple design does the job and costs next to nothing to build.
Looking for a Professional-Grade Solution?
Skip the DIY — Get a Heavy-Duty Pipe Dolly Built for the Job
When you need reliability for professional workloads, a purpose-built dolly delivers the strength and precision that PVC simply cannot match.
Sumner Grasshopper Pipe DollyThis project was born from necessity and a few dollars worth of hardware-store supplies. Hopefully it sparks an idea or two for your own workshop.