
Maintaining your gas range burners properly ensures optimal performance and extends the life of your outdoor cooking equipment. Follow this comprehensive step-by-step process to keep your burners operating at peak efficiency.
Required Supplies
- Premium degreasing cleaner or dish soap
- Clean towels or microfiber cloths
- White vinegar or household cleanser
Necessary Tools
- Non-abrasive scouring pad or scrub brush
- Old toothbrush for detailed cleaning
- Paper clips or thin wire for port cleaning
- Soft-bristled scraper tool
- Flat-head or Phillips screwdriver (when necessary)
Important Safety Notice: Always ensure your gas range is completely cooled and disconnected from the gas supply before beginning any cleaning or maintenance procedures. Never attempt to clean burners when the unit is hot or in operation. The components must be fully cooled and the gas source turned off to prevent accidents during the cleaning process.

STEP 1: REMOVE THE BURNER CAP AND BASE ASSEMBLY
Begin the cleaning process by carefully lifting the burner cap straight upward from each burner location on your gas range. These caps are designed to lift off easily without requiring tools. After removing all caps, proceed to lift the burner bases from their mounted positions on the cooktop surface.
When working with sealed burner assemblies, you may need to disconnect them carefully from their mounting points. Exercise caution during this step to avoid damaging the gas connection ports or ignition components. If removal proves difficult, consult your equipment manual for specific disassembly instructions.
For ranges equipped with cast-iron grates positioned over the burners, these should be removed first to allow full access to the burner components beneath. Set all removed parts aside on a protected surface while cleaning the remaining assembly.
STEP 2: CLEAN THE BURNER CAP AND BASE COMPONENTS
Prepare a cleaning solution using warm water combined with degreasing dish soap or a specialized cleaner designed for cooking equipment. Submerge the burner caps and bases in this solution, allowing them to soak thoroughly. This soaking period helps loosen accumulated grease, food residue, and carbon deposits for easier removal.
For optimal cleaning results:
- Apply cleaning solution generously to areas with stubborn buildup, particularly around the flame ports where grease and debris tend to accumulate
- Use a non-abrasive scrub pad in gentle circular motions to work through any resistant stains or carbonized deposits
- For particularly stubborn residue, allow extended soaking time in the cleaning solution
STEP 3: CLEAN THE GAS TUBE OPENING BENEATH THE BASE
This critical step requires careful attention to detail. With the burner components removed, you now have access to the gas delivery tubes and their surrounding areas. This zone frequently accumulates significant debris that can affect burner performance.
Examine the tubes carefully for any food particles or debris that may have fallen into the openings during cooking operations. Using a damp cloth or sponge, gently wipe away any visible contamination around the tube openings. Take care not to push debris further into the gas delivery system. For deposits inside the tubes themselves, use extreme caution and refer to your range's maintenance guidelines.
Following the cleaning process, meticulously dry the tubes and surrounding cooktop surface to prevent moisture from interfering with the ignition system or causing rust formation on metal components.
STEP 4: GENTLY CLEAN THE IGNITER WITH A DAMP CLOTH
The igniter is a delicate electrical component requiring gentle handling during the cleaning process. Locate the small ignition element positioned near each burner—these sensitive parts are responsible for creating the spark that lights your gas range.
Using a slightly dampened soft cloth, carefully wipe away any residue that has accumulated on the igniter surface. Avoid applying excessive pressure or using harsh cleaning agents that could damage this sensitive component. Ensure the igniter is completely dry before attempting to reassemble and operate your range.

STEP 5: CLEAN CLOGGED BURNER PORTS
Blocked burner ports represent one of the most common causes of uneven flames, weak ignition, or complete burner failure. These small openings can become obstructed by food particles, grease buildup, or carbon deposits from normal cooking operations. Regular port cleaning is essential for maintaining consistent flame patterns and optimal heat distribution.
Port cleaning procedure:
- Use a straightened paper clip or specialized port cleaning tool to carefully clear each opening in the burner assembly
- Work methodically around the burner, checking each port for obstructions and clearing them as needed
- Exercise caution to avoid enlarging the ports or damaging their edges, as this can affect flame performance

STEP 6: REINSTALL THE BURNER BASE AND CAP
After thoroughly cleaning and drying all components, carefully return each burner base to its designated mounting position on the range. Ensure proper alignment with the gas delivery tube before securing in place. The bases should sit flat and stable without wobbling or gaps.
Critical reassembly steps:
- Verify that the igniter connections are properly aligned and secured if they were disconnected during cleaning
- Position each burner cap correctly on its corresponding base—improper placement can prevent ignition or create hazardous conditions
- Confirm that the cap is flush and level; any tilting indicates incorrect installation that must be corrected
Double-check that all components are completely dry before reassembly to prevent potential electrical issues with the ignition system or rust formation on metal parts.

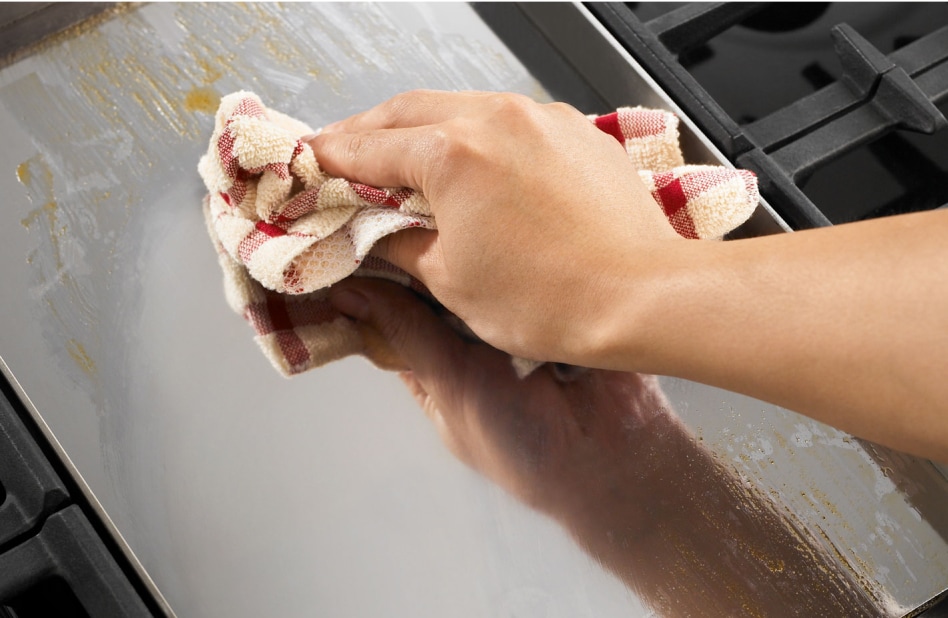
STEP 7: SANITIZE AND DRY THE COOKTOP SURFACE
With all burner components back in position, complete the maintenance process by thoroughly cleaning the entire cooktop surface surrounding the burners. This final step removes any residual cleaning solution, loose debris, or moisture that accumulated during the previous cleaning stages.
Apply an appropriate cooktop cleaner to the surface and wipe down the entire area using a clean, soft cloth. Pay special attention to the zones immediately surrounding each burner where spills and splatters commonly occur. For stubborn stains on the cooktop surface, allow the cleaning solution to sit briefly before wiping away.
Complete the process by drying the entire cooktop thoroughly with a clean towel, ensuring no moisture remains that could interfere with burner operation or leave water spots on the cooking surface.
Recommended Equipment for Your Outdoor Kitchen
Investing in quality gas ranges designed for demanding outdoor and commercial applications ensures long-lasting performance and easier maintenance. Professional-grade equipment features durable burner assemblies that resist buildup and simplify the cleaning process.
Regular maintenance of your gas range burners ensures optimal cooking performance, extends equipment lifespan, and maintains safety standards in your outdoor cooking space. Following this comprehensive seven-step cleaning process on a routine basis will keep your burners operating at peak efficiency for years of reliable service.